|
|
Short article
this time. I thought that would be appropriate after the mammoth one I wrote
for the last update. Speaking of which, how is the head sculpting going for
those of you out there who have tried it? I would love to hear some comments
or see some pictures of your work. Mail them to [email protected].
Anyway, today's
article will focus on how to make custom hands. If you like Mego hands just
the way they are, then this article isn't for you. However, for those of us
out there who would like to replicate the great work we see by guys like Charlee
Flatt, are constantly demanding a greater level of playability from our toys,
then read on!
Have you ever
wanted a Mego hand that was making a fist or that could grasp a gun without
looking weird? Then this article is for you!
And you want
to know the best part of all this? It requires no sculpting! That's right, you
don't have to do any sculpting of the hands yourself.
How so, Matt?
I hear some of you say. If we don't sculpt the hands ourselves, where will
we get them from?
Simple, some
kind people have already done that job for us. A quick walk down the toy aisle,
looking at the multitude of figures put out by Toy Biz, will be very enlightening
for the customizing individual. The first thing I'm sure you'll notice is that,
in keeping with today's harsh comic book images, the figures are very exaggerated.
No stone of overwrought expression is left unturned.
Now this is not
to some people's taste (though I must admit that I have a fondness for these
figures), nevertheless, they do provide great raw materials from time to time.
Lately, I've been noticing a trend with Toy Biz's product in that in order to
get more expressive hand poses, they've greatly enlarged the size of the hands
so that they are out of scale with the rest of the body.
Perfect examples
of this include, Adam Warlock, Nick Fury, the Punisher, Doc Ock. And, in one
of those divine quirks of fate, these hands happen to be wonderfully in scale
with Megos.
However, what
to do about the wrist problem? How to attach them to a Mego body without losing
range of movement? In basic terms we cut off a Mego wrist joint, attach it to
a Toy Biz hand, make a mold of the whole thing, cast it, and presto, it's custom
hand time!
So let's get
on with it.
You will need:
- Mego hands
- Toy Biz Figure with hands in scale to a Mego body
- X-Acto Knife
- Miliput or Plumber's epoxy
- Contact Cement
- Bondo
- Vaseline
- Cooking Spay or Mineral Oil
- 2-part casting resin such as "pour-a-kast" or "liquid satin"
- Nail polish in desired color
|
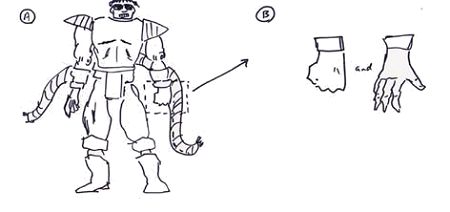
| A) Here we see Dr. Octopus from the recent Toy Biz Spider Man
assortment called, "Web Splashers." I picked this figure because he was
in the clearance bin and had nice expressive hands. |
B) Here we see my ham fisted attempt to recreate how expressive
they look. I'm not the best drawer in this world when it comes to the
human hand. I like a figure that has one open and one closed hand. |
|

|
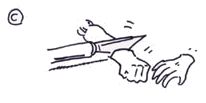
| C) Using your X-acto knife, cut the hands off just at the base,
slightly above the wrist. |
D) With your Mego hands, use the X-acto knife to cut the ball-joint
of the wrist off so that it remains one solid piece (see right). |
|
|
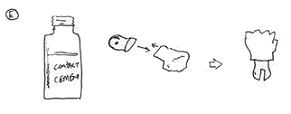
| E) Using contact cement, glue the ball joint for the wrist to
the Doc Ock (or other character's of choice) hand. You'll notice in the
picture on the right that the edges might not always line up.... |
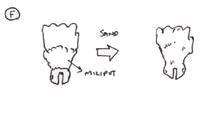
F) ...therefore, he have smoothed this seam out using Miliput
(or Plumber's epoxy putty) and then sanded it smooth. The hand is not
ready to be molded. |

|

|
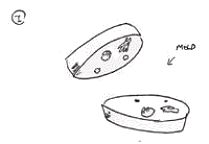
| G) Create a two-part mold in Bondo using the technique described
in my article on "How to Make a Custom Namor." Basically fill a shallow
tub (pregreased with vaseline) with bondo. Grease your custom hands, press
them into the mold along with some pen caps in order to make guide pegs,
allow to set. Once set, coat everything with a layer of vaseline so that
the second part of the mold won't stick to the first.... |
H) ...... Then pour on the second part of the mold. (it might
be worth your while for this job in total to use a better molding agent
than Bondo since hand can be fragile and small trying to get them out
of the mold. Something like a two-part mold-building putty. It's up to
you). |
|
|
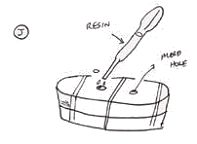
| I) Separate your two mold halves and remove the originals. In
one half of the mold, take your drill and drill pour-holes through the
depression caused by the original hands in the mold so that they go all
the way through to the outside of the mold face. Coat the insides of the
mold with a light smear of mineral oil. Secure it with rubberbands and
a strip of tape around the mold seam to prevent leakage. |
J) Mix up equal parts of the casting resin to be poured into
the mold. Using a bulb dropper, or eye-dropper, or syringe, pour in the
resin until it you can see it backing up the pour-hole. Jiggle the mold
slightly to make sure that the resin just isn't sticking to the walls
of the pour-hole. |
|
If you found that your cast came out poorly or has air bubbles,
try constructing what I call a "poor man's rotocaster." A rotocaster is
when plastic is injected into a mold that is spinning so that the centrifugal
force pushes the plastic resin into all the crevices of the mold.
An easy one can be made by ripping the pocket out of an old pair of pants
and attaching two strings to it as if it were a money purse. Once you've
poured the plastic, place the mold into the pocket so that the pour-hole
points along the radius of the circle defined by the spinning motion.
Now spin the sling around slowly for about fifteen seconds and that should
do the trick. |
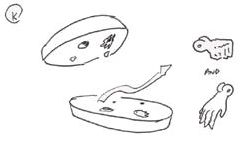
| K) Wait until the resin has set and then remove
your brand new casts of hands! Use sandpaper and X-acto blades to remove
any imperfections. |
|
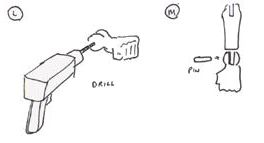
| L) Take a small drill bit and drill a pin hole in the ball joint
of the wrist. |
M) Take the pin that you had left over from step D, and fit your
new hand onto the Mego body, sliding the pin into place. The hand can
now be painted. I've found recently that what works well is colored nail
polish. You should be able to find a variety of colors at your local drug
store. Always seal them with a nail polish sealer. And now you're done! |
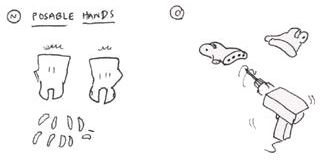
| BUT.......
what if you wanted to make posable hands? Well that's ever easier because
it requires no casting or molding. Here's what you'll need for this:
- Mego
hands
- Drill with very fine bit, or heavy needle
- A thin pottery wire 12-14 gauge (find at crafts and plant store).
- Plasti-Dip brand plastic tool handle coating (available from hardware
store)
- a small tin of toluene* (available at hardware store)
- Old coat hanger
* Toluene
is a HIGHLY volatile chemical and can cause brain damage and liver damage
if inhaled strongly. Always use OUTSIDE with proper ventilation!
|
|
| N)
Start by cutting the fingers off of your Mego hands using the X-acto knife.
If you don't want posable thumbs, leave the originals on. |
O)
Using your dremel, or drill with small bit, or even a heavy sewing
needle, make four sockets for your new fingers to fit into. Make them
sufficiently deep so that the new fingers won't pop out later (about 1cm). |
|

|
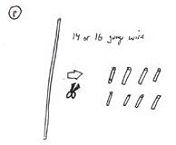
| P) Cut out 8-10 fingers out of the thin wire. You should have
no trouble finding this at a local arts and crafts store. |
Q) Press your new fingers into the sockets created in step O.
Use a wire cutters to adjust their length as desired. |
|
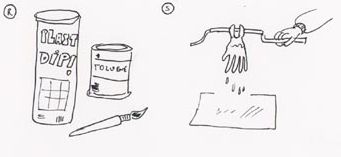
| R)
Read the instructions for using Plasti-dip carefully as it can be dangerous
if used improperly. The fumes alone will knock you on your ass. By passing
a wire through the ball joint of the hand, you should be able to dip your
custom hand directly into the Plasti-Dip to coat it. However, if it is
too thick, it will need to be thinned with some toluene and applied with
an old paint brush. Only MIX THIS IN A DISPOSABLE BOWL MADE OF METAL.
You cannot mix toluene and Plasti-Dip in anything else as it will dissolve
it! |
S)
It's better to use several thin coats rather than one thick one. Follow
the instructions included in the Plasti-Dip carefully, as I will not reprint
them here. Allow your custom Hands to air dry suspended over some aluminum
foil to catch any drips. In a few hours when it has dried completely,
you can..... |
|
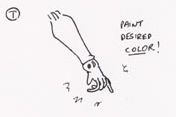
| T)
.....now attach it to the wrist of your Mego body and paint it the
desired color, and voila! you now have posable hands... perfect
for guys like Spiderman or Dr. Strange. |
That's all for today.....
|