
|
Customizing -- Dr. Doom by Matthew Jaycox As many of you know, Dr. Doom was originally planned, but then scrapped b/c it would cost too much. So they retooled the head and made him into Iron Man instead. Today's post will focus mainly on how to make a Dr. Doom head from Iron Man w/o ruining your Iron Man. There are so many ways to approach the idea of making his costume that I will save that for later. (Some might even want to go out to the store and buy a Famous Cover's Doom and dress your custom in his clothes.) Either way, I'll settle a couple of questions right off the bat: To make the Arms: Mine are LJN Rookies arms. I glued a couple of Sculpey circles to the elbow. I then primed it with flat autobody primer. I then spray painted with Chrome hobby spray paint. Let This dry along time before touching! Finish off the picture with some Iron Man gloves molded in gray from Dr. Mego. Type II body arms will probably work just as well though. To make the legs: If you don't have Knight's armor or Tin Man armor to use, take a normal type II leg and remove the foot by pushing out the pin. Make a cast of both feet and retool the cast with some sculpey, smoothing over the area of the toes so it is smooth. Reattach your cast to the ankle and spray paint the whole thing in much the same manner as the arms. Glue sculpey circles to the knees as well.
With that out of the way, on to making the head. Materials: - Iron Man Head - Super Sculpey - Sculpting tools (stylus, smoother, needle) - Bondo Auto Repair plastic
- Plumbers A/B Epoxy or miliput - vaseline - Pam Cooking spray - Needlepoint files - Flat Acrylic model paints - Lego Block Mold Box and some wax paper - Isopropyl Alcohol
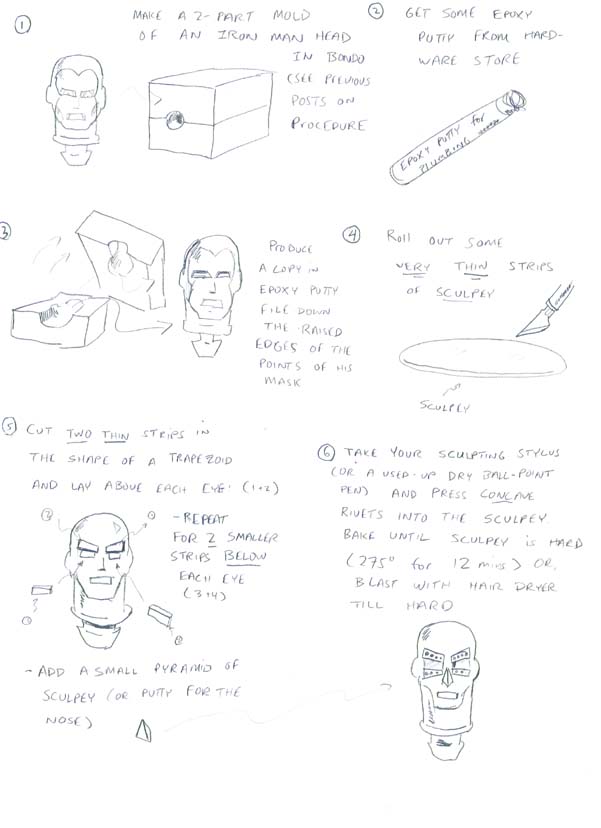
1) Get your hands on an Iron Man Head 2) If you know how to make a 2-part mold or read my last article, skip to step 7. Construct a mold box. I like to use Lego blocks for this. I make the box large enough to fit two heads in side to side, and 7 legos deep. The bottom of the box should be open. Coat the inside walls of the box with vaseline. Place the box on a piece of wax paper which has been smeared lightly with Vaseline. 3) Mix up enough Bondo to fill the box halfway. Mix in a disposable tub (old Margarine tubs are good.) If you coat the inside of the tub w/Vaseline, it can be used over and over. Pour the Bondo into the Mold box and allow it to settle a bit. Once it has start to set slightly, take Iron Man and press the back of his head into the Bondo until mid-earline. (See fig 1 below) Make sure the flat of the neck plug touches one of the walls of the mold box. Then take a couple of pen caps coated in vaseline and press them into the Bondo at two separate places. (These will eventually make guide pegs for the mold so it will always line up.) 4) Once the mold has set, with your head still in there, coat all surfaces (excluding the head. The head won't stick to the bondo) with a thin coat of vaseline, This will keep the second part of the mold from sticking to the first. Mix up some more Bondo and pour it on top of the head slowly so no air bubbles form.. Fill to the top of the mold box. Allow this to set. 5) Remove the Legos and you now have a complete mold. Use a putty knife or screwdriver to separate the two halves. Remove the original head and clean it off. You now have a mold of Iron Man 6) Coat the insides of the mold with a little cooking spray and work it into all crevices. Knead up some epoxy (enough for one head) and press it into the mold. Fit the two halves together. SEcure them with several rubber bands. Some of the excess should squeeze out the hole in the mold by the neck plug. You will know it is done curing when this is hard. When done, carefully remove your brand new cast of a head. 7) File away the points of the Mask (You may also want to, although I didn't, to remove the ear pieces). Take a thin square file and file the mouth a little to make it more square. In addition file under the mouth to make it more prominent. File down the cheeks as well in order to make the points of the cheekbones of the mask stand out more. (see fig. 2 below). 8) Roll out some Sculpey very thin and cut two small complimentary trapezoids (a trapezoid is a parrallelogram with two parallel sides and the other two in this case have complimentary angles but going in different directions.) And Place one above each eye. (Fig five below). Repeat with smaller pieces below each eye. Now make a little triangle nose either out of Epoxy or sculpey and attach it to the nose of Iron Man. Smooth all seams. Take your stylus (Or an old, dried out ball-pt. pen) and press "Rivets" into the strips of sculpey. Bake in the oven at 275 degrees F for 12-15 mins until hard. Or just blast with your hair dryer until hard. If strips fall off, simply reattach with model glue. (See fig 6 below) 9) Take a heavy needle and poke holes into the epoxy head to stand for rivets wherever you like. (see fig 7 and picture of Iron Man head close-up below). 10) Your head is now ready to be painted. Use flat acrylic modeling paints as I've said before, and paint the head a base coat of black. Make sure you work the black into all of the concave rivet holes. Next with very little Silver on your brush at any one time, paint the head silver, but don't fill in the holes. This requires a light touch. You are almost dry-brushing on the silver so as to only paint the raised areas, and the lower areas , such as the rivets, will remain black and really make the mask stand out. Finally paint in the whites of the eyes. To really get that DOOM look you should only paint the top half of th eyes as if he was looking down at you. AS I said, costuming tips to come later. That's all for now though. Hope you liked my article. Matt
|


| CUSTOMEGO | GALLERIES | HOME | FAQ | FORUMS | SEARCH | CONTACT | LINKS |