|
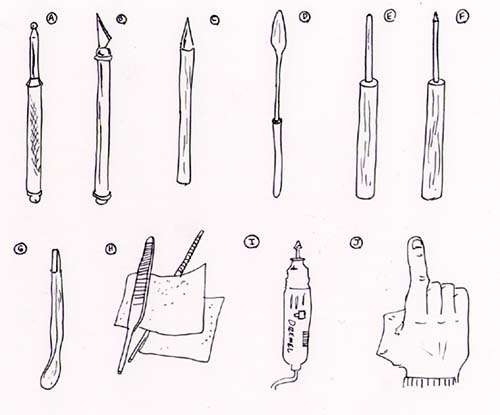
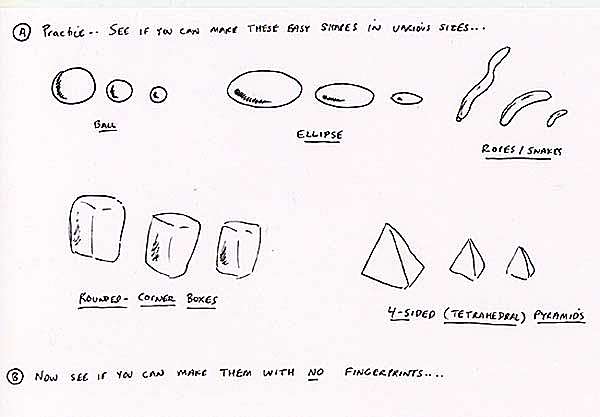
Hi all-- Well I've finally followed through-- here is the long-awaited article on "Learning How to sculpt your own Mego heads." I had originally envisioned this as being a sort of photo essay, but none of the photos I would take ever would turn out nice and clear and sharp. I will amend this article one day with photos (perhaps when I get a digital camera or someone lends me theirs), but for now this article is entirely pen and ink-illustrated. Though I have tried to be clear as possible. Okay, now onto the sculpting. The very first, most important lesson I could teach you is to BE PATIENT! Sculpting is hard.... but it can be learned with practice and patience, and especially if you learn to keep a clear head and not get frustrated. But, more than anything else, it is a task which requires the proper tools. Without the right instruments, you simply won't be able to produce much that looks good. So, you might as well prepare yourself for the financial hit of picking up some of the following items. Were possible, I have included some cost-cutting measures. TOOLS YOU WILL NEED: Many of my tools were customized by me to fill my exact needs. Many people will swear by old dental tools, but I have found little use for them and you will pay a lot for them many times at the flea markets. The ones I've listed below are the only ones I even use, and they more than get the job done. Here is a brief description of each. A) BALL-POINT STYLUS (BP-Stylus). This tool is made of stainless steel and is good for a number of uses such as rolling seams with the beveled tip or pressing in indentations for things like dimples. It is available from crafts stores in the sculpting and clay aisle. Price is $2-4. B) X-ACTO BLADE. Highly important tool with a number of uses which will be seen later. Good for cutting hard and soft material and for fine detail work. I actually have two with different size blades. Make sure you have a package of spare blades, because you will go through a few. Price: (knife with spare blades) $6-7. C) PENCIL TIP ROLLER. This is good for flattening clay and for rolling out imperfections or fingerprints or smoothing seams. I made mine by simply sticking one end of an old wood paintbrush handle into a pencil sharpener, and then sanding it to a nice fine point. price: negligible D) MICRO-SPATULA. It is not necessary that your equivalent tool to this actually be a micro-spatula (a tool used in chemistry labs to measure out fine amounts of powderous materials), mine just happens to be one, so that is what I will call it. Many times they are available from college book supply stores. If not, simply make one by sanding down an old pop-sickle stick into the indicated shape with sandpaper. This is a great tool with many uses. price: 0-$5 E) REGULAR STYLUS. (R-stylus) This will be your most versatile and best tool for fine detail work. It can shape clay, remove it, drag lines, press in indentations, and round surfaces. They are very hard to fine, so had to make my own. It is different from the BP-stylus in that it has no ball-point tip. It simply has a straight, rounded, blunt tip. I made mine by sticking a rounded, blunt, heavy knitting needle into a piece of 3/4" doweling that was about 3.5" long. You can sand the doweling down to give a comfortable grip to your hand. Price: needle and dowel rod: $2-3. F) POINTER (THIN STYLUS). Even though this is basically the same as the last tool, only thinner and with a sharper point, I call it a pointer b/c its functions are different. This is very similar to a tool found in most dissection kits which you can pick up at some hobby stores. Though I just made mine by sticking a large (though smaller than the one in E), sharp needle into a piece of 1/2" doweling cut about 3.5" long. Price: $2-3 G) 2-PART SMOOTHER. This tool comes from boxwood clay modeling set. You can buy a set like I did for around eight bucks, but this is the only tool I use out of it. It has a fin smoother on one end (like the fin of a fish), and a semi-circle smoother on the other end. I use the small end for indentations such as, at times, eye sockets. I use the large end for smoothing out large areas of clay. You will probably find, however, that the semi-circle end is too large for your purposes. No matter, simply sand it down until it is about 1/8"-1/16" wide and more flat. Remember, the smaller the tool, the finer the detail you'll be able to achieve. Price of a whole set: $7-9. H) NEEDLE-POINT FILES AND SANDPAPER. These are very critical to have. Needle point files are used for such things as fixing eye-glasses or sharpening the teeth of saws. They can be found at the hardware store and a set usually includes about 6 files: a round file, a square file, a flat files, a semi-circle file, and two others. Sandpaper should be bought in coarse and fine grades, a lot of it. You will use it quickly. Price: (for sandpaper and file set) $20. I) DREMEL.* This is the microwave oven of customizing/sculpting--you'll never understand how you got along without it. I worked for a year and a half on customs before I got mine, using only files and sandpaper-- this thing was like the holy hand grenade. It made so many things so much easier. The Dremel is similar to a drill but is smaller and handles more like an electric screwdriver than like a drill with bits. It can fitted with a number of specialty bits which can sand, file, smooth, saw, engrave, and polish almost any plastic surface, save vinyl. You may need to buy some small fine bits for it, but much of what you need will already be packaged with a standard set. Remember, you are not doing woodworking or embossing marble, so the Dremel you get does not need much torque (rotational force), so you really don't need to get the super-duper top of the line model. However, I would recommend AGAINST a cordless model because what you gain in ease of handling, you lose in life as any one battery pack only gives about 25 mins of work time for every 3 hours you take to charge it. At this rate, you'd want a second battery to be charging while you discharge the first one, and then you're starting to talk some major dollars when you start buying extra batteries. Plus you always have to have a free outlet to plug it into to keep it charged. All in all, I'd say go with a standard, two-speed Dremel. CAUTION: It is important that you use appropriate eyewear when working with this thing, few things have ever hurt worse than a stray shaving of plastic in the eye! Price: $45-60 (keep an eye out for sales at Wal-Mart). Stick with the "Dremel" brand--don't let them try and sell you on a Black and Decker equivalent--finding the parts will be a pain in the ass! Note: a fine point craft extension arm can be bought for a standard dremel for finer detailing work and ease of movement when working. I have bought one, though have yet to try it out. It runs around $30. Note*: Though I recommend anyone who is serious about sculpting/customizing to pick one up, I will write this article assuming you don't own one, and then you can decide for yourself if it's worth your money. J) YOUR FINGER: Believe it or not, this is the single most important tool in your sculpting arsenal. The majority of all the shaping, smoothing and general application of clay will be done by your finger. Keep it smooth and free of calluses. Use hand lotion and nail files so that it will not snag the clay when you work. And the best part is you already have it. Okay-- so there's the tools... But what about the Medium? What do we Sculpt in? We will use what is known as a polymer clay. This is a plastic-based clay that hardens when it bakes yet has the resiliency and feel of plastic. There are several brands on the market. Some people swear by Fimo, but it chips too easily for my taste. Some people like regular Sculpey, and are drawn to it because it is available in so many different colors, but it just doesn't have the reliability of... .... the customizer's best friend, SUPER SCULPEY. It is exceedingly easy to work with, rather inexpensive, has many great uses, can continuously be added onto, can easily be sanded and painted, and is (its best feature) highly Chip and Shatter Resistant. When it cures it is very lightweight as well. It is available at most crafts stores for around $10 per box. It may remind you a bit of silly putty. Okay, so now that you know what you need, get up off your can and go get it. When you return, I'll show you how to begin with the basics.... What're you still sitting at your computer for, reading?!? Get going! Okay, you're back. Good. Now let's get started. Before we actually get down to the making of heads, you've got to get yourself acquainted with some of the basics. So here's where I pull the equivalent of a Mr. Myagi with a "wax-on" "wax-off" approach. Now don't worry, I am not going to make you sand my deck. But alot of sculpting is based in the ability to make and apply certain fundamental shapes like the following: - Spheres
And you need to be able to make them in a variety of sizes and handle them with a delicacy that won't deform them. So drop any expectations you had of actually getting to the sculpting today, and begin your training by seeing if you can make these simple shapes in several sizes. You will only need your fingers for this, but you can use your tools if it makes it easier. For the smallest shapes, see if you can make them about 1/2 the size of a grain of rice. (Try gently rolling between thumb and forefinger). Follow (fig. A) as a guide. Take a few hours. I'll be here when you get back. Okay, now for your second lesson. See if you can make all of the preceding shapes, but with no fingerprints in them. This can be accomplished by lightly, but swiftly, brushing your finger in ONE direction over the surface of the clay. This is one of the most important techniques to learn. You can also accomplish this to some degree by using your roller tool. Finally, when you've got fingerprints in a complex area that you can't get out, apply a small smear of Isopropyl (Rubbing) alcohol with a paint brush to the area LIGHTLY. Isopropanol is a solvent of polymer clays and can be used to dissolve imperfections provided you don't use too much. If you put too much on, blow on it quickly in order to evaporate it as rapidly as possible. Apply only with a paint brush, not with a q-tip. Okay, go practice this and come back. Okay, are you feeling confident? Are you feeling like you've got a handle on this clay? Alright, then let's begin. One of the mistakes that beginning sculptors make when dealing with Super Sculpey is that they don't realize that it can be baked partially, have more clay applied, baked again, add more clay and so on... This comes in really handy because it allows you to bake certain areas of the sculpt that are relatively finished and that look good, and will allow you to handle them while you work on the rest of the head w/o ruining your job. Now when working with other clays, sometimes it's wise to create an inner armature of wire for the sculpted piece to anchor itself to, but I've found this only causes trouble with S.S. (super sculpey), because the heat generated by the wire inside the clay causes hairline cracks to form as it bakes. No, I like my approach much better, and we will thus assemble our head in the following stages: 1) Neck,
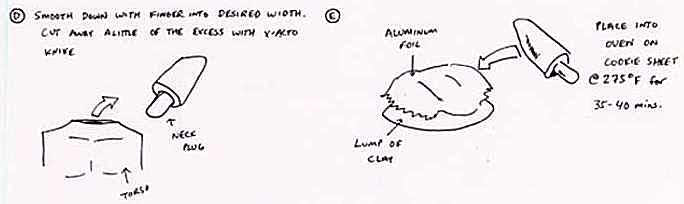
Stump, bake By baking in stages we don't have to worry about ruining previous work. So let' s being with the first part, the neck, and neck plug: Pull off a lump of S.S. about the size of a Mego head and knead it until soft and warm. Roll it into an ellipse that is about as thick as a Mego neck and tapered at both ends (fig. C). Push this into the neck hole of a Mego body. Some of the clay will be forced through the hole into the body cavity, and this will serve as your neck plug since this squeezed clay will be the same width as the neck hole. Coating the inside rim of the neck with a little cooking oil will ease in the removal of the stump from the neck hole when the time comes. Taper the upper part of the stump to a point (this point should end about 1/s" lower than how high you want the uppermost portion of the future head to reach. So if the crown of the head is x-inches high from the base of the neck, the point of the stump should be about x-1/2"). This point will serve as the armature of the head and you will "impale" (for lack of a better term) the future clay of the head on it. Smooth the stump by running your finger over the surface of the clay in one direction, lightly. Use the X-acto blade to cut away any excess that you have smeared onto the torso now. Preheat your oven to 275°F, and take a large lump of clay and press it into the shape seen in (fig. E). You are creating a pedestal for your future sculpt to rest in as it bakes. To keep it from sticking to your sculpt, cover it with a scrap of aluminum foil, and then place this on a cookie sheet lined with foil. Holding the stump near the top, so it won't matter if you damage it, remove the stump (fig. D) from the neck hole and lay this onto the pedestal, and bake this thing for 35-40 mins.
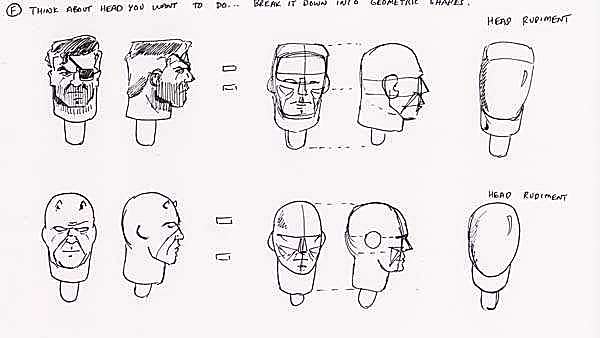
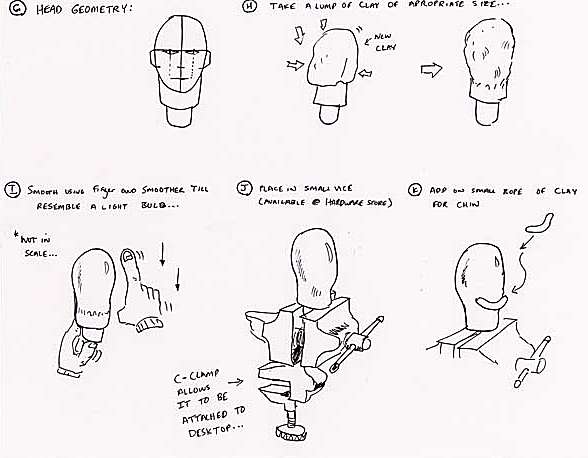
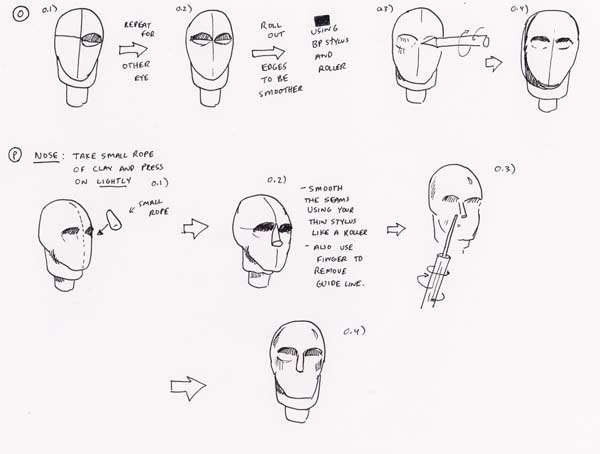
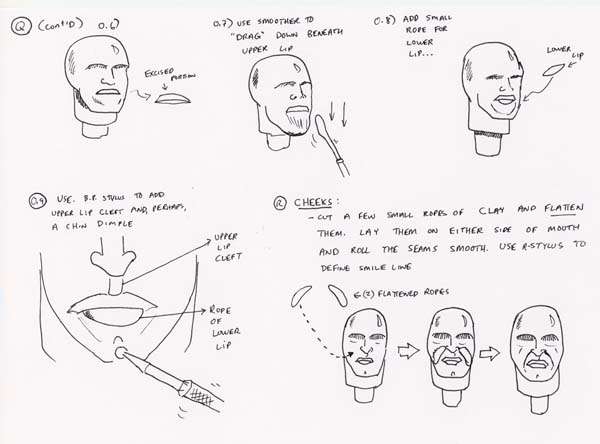
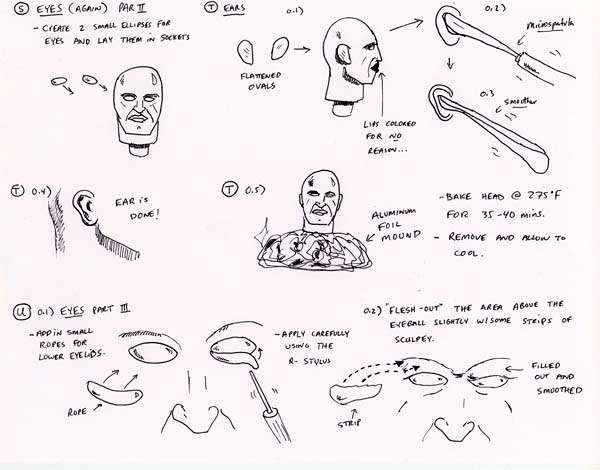
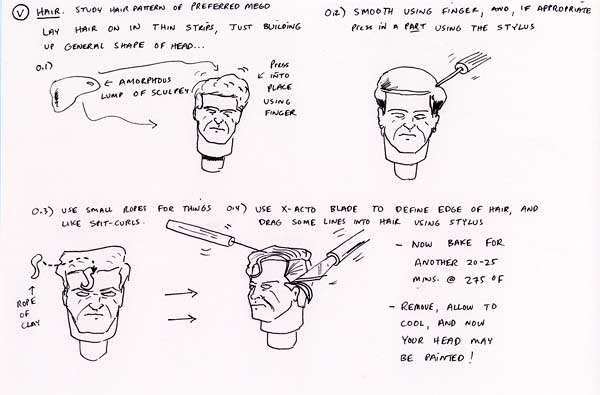
While it is baking, there are some things we should think about, i.e., what head do we want to create? Male heads are easier to sculpt than females, because they have easy, identifiable lines. And though this is a gross oversimplification, almost all heads can be broken down into simple geometric shapes. (See fig. F). Notice how Nick Fury (whom we'll be sculpting), has what I call a "toaster head," because it is very box shaped, with a hard nose. The Punisher would be similar. But Daredevil has a more slender, rounded head. To the right of both images, we see what types of rudiments we would attempt to create in clay. So... pick a character, do some control art, and think about breaking the head down into corresponding geometry. Tape these pictures up around your work area for constant reference. Okay, your neck plug should be baked by now. While it cools, let's talk some simple head geometry (fig. G). The head, and for that matter, the whole body is comprised of corresponding measurements. The aorta is approx. the width of your thumb, your heart is the size of your fist. The face is no exception. Draw and imaginary line down the center of symmetry, and the level of the eyes would be in about, or slightly above, the middle of the head. The distance between there and the chin, would find the tip of the nose about half-way down, and inside that distance, would be the mouth. The extent of the lips at rest line up with the pupils of the eyes, while the bottom of the ears lines up the bottom of the nose, and the top of the ears, with the eyebrows. Study pictures in a magazine to get this right, as well as other Mego heads. Okay, so your neck plug is cooled. Take a lump of clay of appropriate size and impale it on the spike of the stump. Form it into the general shape of the head (similar top the shape of a light bulb) (fig. H). Smooth this over using your finger while holding onto the areas of the neck you've already baked. Smooth the seam where the new clay meets the old clay with your roller and finger (fig. I). Now it would serve you well to buy a small table top vice for exactly this sort of thing, for it can hold your head so you have two free hands to sculpt. They come attached with a small c-clamp so it can be clipped to a work table. They are about $10 at the hardware store. Sorry I didn't mention that before. (fig. J). Take a small rope of clay and lay it on as shown in (fig. K) for the chin. Roll this smooth with your roller and finger. Also define the under edge of the jaw using the small end of your 2-part smoother (tool G) and your finger. Smooth over any fingerprints. A microspatula works well for this too. Use your finger and apply light pressure on top of the head to flatten it a little (fig. L). Using the pointer, lightly trace lines for the placement of the eyes and nose and mouth (fig. M). Don't make them so deep, that they can't be rubbed out later. To make the eye sockets. Take your microspatula and place it with the beveled tip almost touching the vertical line of symmetry (fig. N). Rotate it at about 45°, (fig. N.2) and lightly press in the eye cavity to an appropriate depth (figs. N.3, and N.4). Your head will now look as shown in (fig. O.1 and O.2). Using your BP-stylus and your roller, gently roll out the cavities of the eye, so that the edges aren't as sharp (fig. O.3 and O.4). That' s all we're going to do for the yes for now... Onto the nose. Take a small rope and lay it on lightly along the line of symmetry, onto the head (fig. P.1). Using your pointer (aka thin stylus) like a roller, roll the seams where the clay of the nose meets the clay of the face, smooth (fig. P.2). You can use the R-stylus for this as well. If you mess this up, simply cut the nose off and try again. You can now remove the guide lines with your finger or roller (figs. P.3 and P.4). To make the nostrils, add little balls of clay to either side of the nose, and roll the seams with the pointer tip as seem in (fig. P.5). Take your BP-stylus and press in little indentations for the nostrils (fig. P.6). In profile, your head should now look like that seen in (fig. P.7). Okay, we've got the eye sockets, the nose, now we need the mouth. As you've probably noticed, your moth slightly bulges outward from the rest of the face in what I call the "oral mound." To make this, simply make a small disc of clay (by flattening a ball) about as big as shown in (fig. Q.1 and Q.2). Place this just below the nose and smooth the seams. In profile it should bulge out slightly (fig. Q.3). To make the upper lip (at least of a closed mouth), we don't sculpt it so much as we cut it away. Trace the line of the upper lip in the mound using your pointer (fig. Q.4), and then with your small X-acto blade, on a 45° angle, cut away the upper lip. To get an idea of how deep to cut, the innermost end of the upper lip should line up approximately with the back edge of the nostril, somewhat exaggerated in (fig. Q.5). Smooth the upper lip with the R-stylus and microspatula (fig. Q.6). Now use your small smoother or microspatula and drag down on the clay beneath the upper lip, so that the clay is recessed beneath the upper lip and bulges up at the chin (fig. Q.7). This excess can be removed later if need be. Now add a small rope beneath the upper lip for the lower lip (fig. Q.8). It should not be as long as the upper lip, otherwise your head will look like Edward G. Robinson ("Don't shoot me Mugsy, I'm you're pal, Mugsy, you're pal! Yeah...") Once you've laid the lower lip in and smoothed it with your R-stylus, or even a small application of alcohol, use the BP-stylus to press in the cleft of the upper lip. You may also add one to the chin if you'd like (fig. Q.9). And now the mouth is done! Onto the cheeks... roll out a couple of small ropes of clay for the smile lines of the cheeks, and flatten them out so that they taper along one of the edges. Lay these on either side of the mouth with the uppermost parts on either side and slightly above the nostrils. Roll smooth with your roller, finger and microspatula (fig. R). Use the R-stylus to define the inner edge of the smile lines. Now we will add in the eyeballs. Add two small ellipses into the eye sockets of the same size. Nothing looks worse that 2 different size eyes (fig. S). If these fall out while baking, they can be glued back in. Make the ears by cutting flattened ovals of the shape as seen in (fig. T). Press these to either side of the head, then to make the outer ear cavities, use your microspatula to press in lightly. Then, going just inside of that (i.e. proceeding toward the face), press in again deeper with your small smoother (figs. T.2 and T.3). Your ear should now look like (fig. T.4). Okay, it's time for the next baking stage! You'll want to bake this head upright so it doesn't rest on and deform any of the areas you've sculpted. Accomplish this by making a ball of aluminum foil. Flatten it on one side and then press your finger in the center to make a socket for the neck plug to rest in. Make sure this is nice and secure, then place this on a cookie sheet in the oven preheated to 275°F for 35 mins. again. (fig. T.5). Okay, now that your head has cooled, it's time to add the final details of the eyes. Add small ropes of clay under the eyes foe the lower eyelids. Flesh out the area of the eye socket above the eyeballs using a thin strip of S.S. Define the lower edge of this (which would be the upper eyelid) using your R-stylus. Reference a Mego head other than Superman or Robin to see how this would look (they are kind of simplistic sculpts and ignored this anatomical feature, which is why they look so goofy) (fig. U.1 and U.2). Remove the fingerprints with a small smear of alcohol. Now, many of you have probably made hair with me before, and it's the same as all of those other times. Just layer on amorphous strips of clay onto the head to build up the general shape of the hair (fig. V.1). Smooth this out using your finger or fin smoother, and if appropriate, press a part into the hair using the BP stylus (fig. V.2). Use small ropes of clay for hair details like waves or spit curls (fig. V.3). Define the edge of the hair by cutting away and pressing with the blade of your X-acto knife. Drag some lines into the hair using your various size styluses. Remember, hair lines are not short and all uniform in length--many times they are long and flowing. Study other Mego heads to get an idea. To get rid of the little clay shavings that build up in the hair lines, paint the head lightly with alcohol. Place this head back in the oven at 275°F for about 15 mins. Remove and allow to cool (fig. V.4). Use your sandpaper, files and Dremel to make any final revisions or to remove any imperfections. Your head is now ready to be painted! For my Nick Fury, prior to painting, I would simply add a small piece of electrical tape for the eye-patch and paint the cord of it in. I am sure you can figure out other solutions to this as well (fig. W). I have shown you how to paint several times before, so I won't go over it save to say that I typically paint in this order: 1) Base
color of flesh Always use flat acrylic modeling paints. I don't seal my paint lately as I like the nice flat look and I don't plan on getting them wet. Work slowly on this and don't get impatient (fig. X) Now, we are almost done! But how to fit the head onto the body so it won't pop out. This is simple. Simply wrap a short length of PVC (electrical) tape around the neck plug tightly. It will widen out, but compress enough in the neck hole to give a nice, tight fit. It is important that when doing this, you press the head STRAIGHT down into the neck hole, and that if you twist it in like a cork, you only twist in ONE direction, otherwise the tape will buckle up and snag. You actually might want to fit the head to the body BEFORE painting b/c that way you won't ruin your paint job by forcing the head on.... your call, though (fig. Y). And that's all there is to it! SPECIAL SOLUTIONS: I was recently at the Dearborn, MI comic show and Flattworld Figures was there, and I got to see some Flatt originals up close. What particularly impressed me was one of Charlee's innovations that allows his custom heads to look in all directions, not just spin around. It's accomplished by rounding off the base of the neck, and attaching it via elastic to the post that runs through the pelvis of Mego bodies, like on the female figures. To make this, simply sculpt the head as before. At the end, however, prior to painting, use your large X-Acto knife to whittle down the neck into somewhat of a blunt point (fig. Z.1). Use coarse sandpaper or a Dremel to sand the base into a nice, round, bottom (fig. Z.2). Take a VERY SMALL eye hook and drill a starter hole for it using a small drill bit, in the bottom of the neck of your head. I can't stress enough that the eyehook be small, otherwise it could cause cracks to form in your sculpture as you thread it in (fig. Z.3). Thread a length of elastic through the hole and tie the two free ends around the pelvic post (Gawd, that sounds obscene!) of your Mego body, and you now have a head that can look up and down, side to side, cock its head to the side as well. See my close-up head sculpts of The Phantom, The Flash II, Dark Knight Batman, and Captain America to see how this looks. Well, that's all for this time. I hoped this helped you guys with your sculpting woes (Scott Metzger). I know I kind of flew through some sections in this article, so if you have any questions, feel free to e-mail me at : [email protected] Note: I will NOT respond to any e-mail that incorrectly addresses me as "Jay" when my first name happens to be "Matt." Sorry, just a pet peeve. Join me next time when my article will show you how to make custom hands of different poses, and how to make posable hands! Until then (this is funnier if you imagine John McLaughlin of the McLaughlin group saying it), Happy Customizing, Feliz Navidad, Merry Christmas, Happy New Year, Chanukah, Kwanza... Bye Bye! Matt
|


| CUSTOMEGO | GALLERIES | HOME | FAQ | FORUMS | SEARCH | CONTACT | LINKS |