|
Making a Suit Jacket: This is one of the hardest things you will ever have to sew, but if you can master this, you can master anything. It's actually not as hard as it looks though. Most people can sew pants. If not, proceed to my article on the Greatest American Hero. Sewing pants is the same as sewing leggings, except you leave the legs open and hem the cuffs of the pants and the waist. No Biggie. You can even use the same pattern, I do. But a suit jacket.... Well, you follow my instructions and decide for yourself how hard it is.
You will need: - Fabric
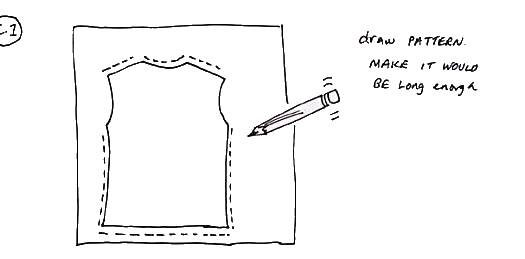
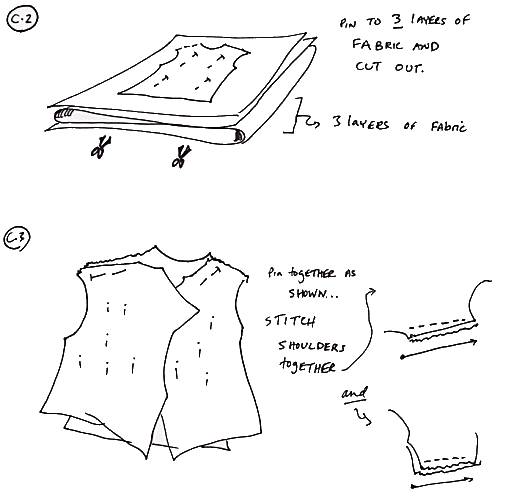
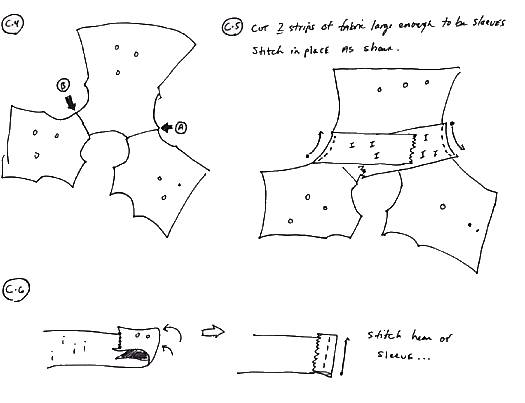
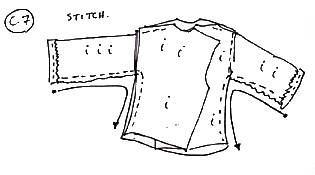
of desired color/style Start by drawing a pattern similar to the one seen in (fig. C.1). Make sure the pattern is long enough to reach from shoulder to knee. Note: if you are making a trenchcoat, simply extend the length of the pattern vertically and proceed as per instructions. Pin this pattern to 3 layers of fabric and cut along the lines (fig. C.2). You will have to make the measurements of your Mego yourself. Be sure to add a 1/8" seam allowance. A good example to study as a reference is mad monster Frankenstein or The Joker. Once you have cut along the lines, you should have three copies of the pattern (fig. C.3). Align the shoulders of the pattern as seen in (fig. C.3). Although the drawing may not be clear, we are doing this so that one of the three patterns will eventually serve as the back of the jacket, and the other two will serve as the two halves of the front. True, we didn't need all that detail in the front flaps, but it saved us from making a second pattern, eh? Anyway, pin the shoulders of the patterns as shown in (fig. C.3), now stitch the two shoulders that are pinned. When that is completed, lay your garment down as shown in (fig. C.4). Points "A" and "B" correspond to where the sleeves will be stitched to the shoulder of the garment. Cut 2 strips of fabric of sufficient size to be sleeves (get out that tape measure again) and stitch one end of each to points "A" and "B" as seen in (fig. C.5). Note that the i-sides of the sleeves are facing you. Now fold back the edge of the wrists toward you and stitch the hem of the sleeves (fig. C.6).
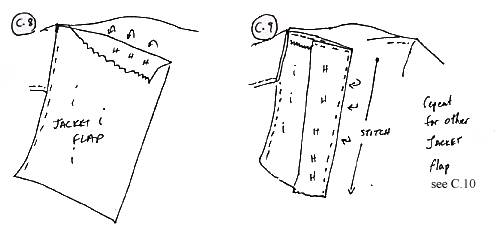
Okay, now with the Left Front Jacket Flap, fold the top edge down toward you and stitch the top edge of the hem (fig. C.8). Now, with that same jacket flap, fold it approximately one third over, lengthwise, and stitch along the longitudinal edge (fig. C.9). Repeat for the Right Front Jacket Flap.
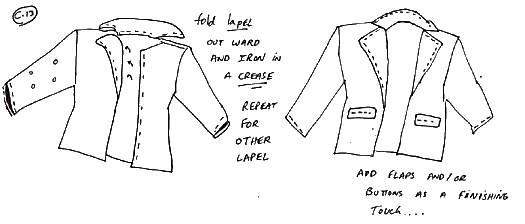
Okay, now turn your garment right side out again. Fold the lapels outward and make them stay that way by ironing a crease into them (fig. C.13). Finish off the picture by sewing on a couple of pocket flaps or small buttons from the fabric store. But I'll leave that to you to figure out. If you want to see an example of a suit coat I've sewn, either go see my custom Two-Face or custom The Shadow. Both feature some of my best tailoring. So, until next time.... Happy Customizing! Next Time: How to Sculpt your own Heads from Scratch!
|


| CUSTOMEGO | GALLERIES | HOME | FAQ | FORUMS | SEARCH | CONTACT | LINKS |