
|
HAND-SEWING
A MEGO-STYLE CAPE
Mego made all of the capes from the WGSH line out of a stiff material known as nylon. Nylon is a polyester that is dyed when it is still in liquid form. The plastic is pulled out in thin strands and then woven to make material of the desired texture and feel. Hence nylon can be used to make stiff fabric like the capes of the heroes, or thin shimmery material like pantyhose. As such, it can't be dyed very well, so good luck trying to take existing capes and get them to suit your purpose with dying. No... the sad fact of the matter is that you will probably have to (gasp...no!) make your own. But this is really no problem because I made this as easy as possible for you, and only included sewing where absolutely necessary. If you take a given Mego cape to the fabric store, the sales clerk you should be able to point you exactly where to go to find nylon like this. So go pick up some fabric in the desired color. Go! Right now! And while you are there, you will also want to pick up the following items: - needles
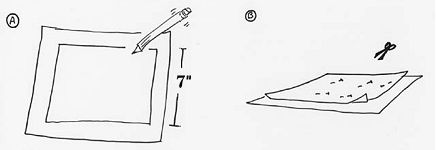
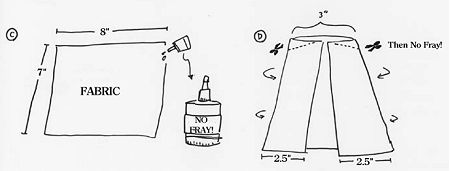
A) To make a standard cape, first draw a pattern. An easy cape pattern is just a rectangle that measures 7" x 8". B) Pin the pattern to your fabric and cut out along the lines of the pattern drawing.
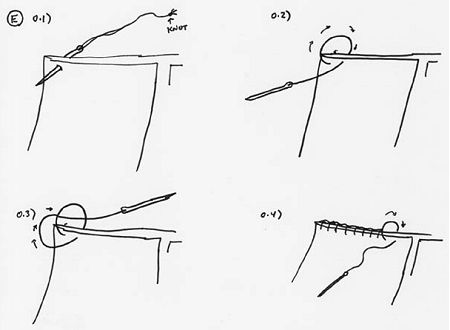
C) Use a SMALL amount of no-fray along all of the edges. You may wait till it dries or speed up its drying time by turning the hair dryer on it. D) Now fold the square over on both ends like a tri-fold menu with the fold edges almost meeting. The middle section should be about 3" wide, and the two folded sections should be about 2.5" apiece. On an angle, up near the shoulders of the cape, cut away the fabric so that the cape will hang naturally. Use no-fray on the seams.
E) Now we are going to stitch the shoulders closed. To do this, we are going to use a hand-sewing technique first discussed in my article on customizing the Green Lantern. This technique is known as quilt stitching. This is very similar to a normal "loop-running stitch" which many of you may know without actually knowing the name of it, however, with one slight modification. With a quilt stitch, you stitch a loop, but before pulling it closed, you begin another one and feed the end of the thread through the previous loop, and then pull the loop closed. This ties off each individual stitch and makes for a stitch that won't unravel on you and is very strong. It also makes for a straight line across the top of the stitch. Refer to (figs E.1-E.4). So your two edges of fabric are aligned as seen. I stick the needle through the back first, going through the front. My thread has a knot in the end so it won't pull through. I make a loop away from myself (fig.E.2), go back through the behind fabric, then the forward, but before pulling loop 1 closed, I feed the end of the thread through loop 1 (fig. E.3), and then pull it closed over the thread. (Fig E.4) details a series of quilt stitches. Again, the order of the stitch is: Over, Back, Around, Through the loop, Pull closed. This is easily remembered with the mnemonic; "Our Baby Always Talks Preciously..." Stitches should be spaced about 1/16" apart, and should begin about 1/8" below the edge of the fabric. Keep your stitches small and tight or they will show dramatically on the other side when the garment is turned right side out. Stop sewing about 8/10" from the edge of the fold.
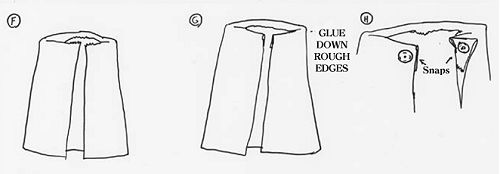
F&G) Turn the cape right side out. You will notice that you have ragged edges on the back of the neck and at the ends of the folds nearest the neck. Simply fold these down and glue them in place with a small amount of fabric glue. H) Now's the time to sew on a couple of Mego snaps. This is not something that I can really give you a hand with. If you find this difficult, I'm not sure there is much point in going on (with customizing that is.... not life. Though who would want to live if they couldn't customize?)
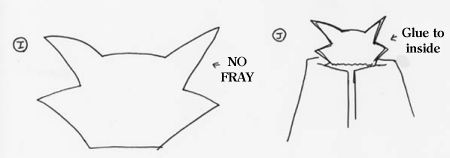
I) If you are making Dr. Strange's cape, draw a pattern similar to the one shown here. Pin it and cut it out of the fabric. Use No-Fray on the edges. J) Glue it to the inside back of the neck of the cape using the fabric glue. To finish the picture off, use the fabric glue to glue strips of yellow ric-rac to the edges of the cape in order to get the gold border look of Dr. Strange's cape.
If you don't want to make the cape separate, you can stitch it to the fabric of the costume of whatever character you're making. There you go... Good luck. Matt
|


| CUSTOMEGO | GALLERIES | HOME | FAQ | FORUMS | SEARCH | CONTACT | LINKS |