
|
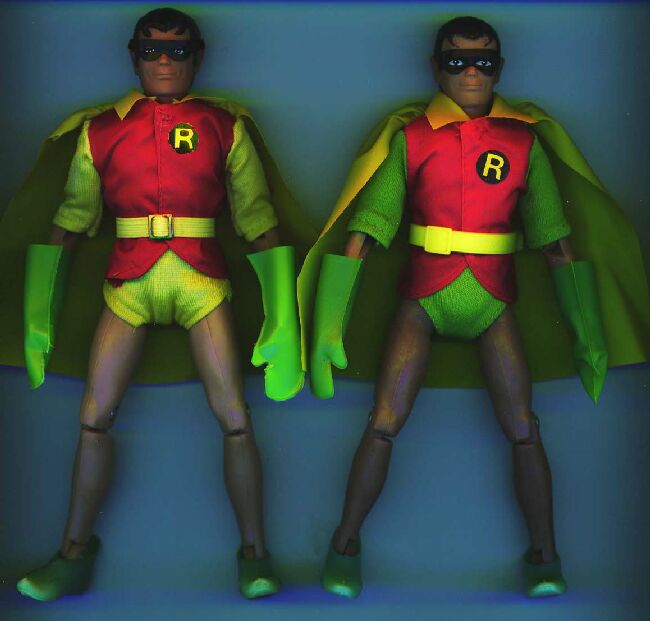
Customizing -- Removable Mask Robin by Matthew Jaycox Welcome to my second customizing article. I can only judge by the amount of posts that show up at the Mego Buzz, that many people are interested in knowing how to make a custom RM robin. I've seen alot of these things, but what you have to realize is that there is alot more to making a RM robin than just removing the painted mask and making him a vinyl one. Keep in mind that this was one of the first figures Mego made and they screwed up the color scheme on the outfit, accidentally giving RM robin YELLOW trunks and sleeves instead of GREEN ones. In addition, RM robin had a yellow ELASTIC belt similar to Supergirl's as opposed to PM robin's plastic belt. So, any truly AUTHENTIC custom RM robin involves replacing the sleeves and the trunks, not just the mask. "But Matt," I hear many of you say, "Won't that require sewing and ripping the existing seams of my Robin?" Yes, it will. But It is very easy if you have little patience, a sewing machine, and a will, and I will walk you through it w/step-by-step illustrations. So let's get started!
YOU WILL NEED: - PM Robin figure, complete (except for belt), on type I body preferably - Yellow poly-interlock fabric, 1/4 yard, (See pix @megomuseum to approximate the right shade of fabric) - Yellow thread - Sewing machine and some sewing skills (or a Mom/Sig. other who has some). - X-Acto knife with fine blade, VERY SHARP! - No Fray - Thin Black Vinyl - Black Elastic - Cyanoacrylate glue (or contact cement) - Yellow elastic - Old margarine lid - Flat acrylic modeling paints & brushes - Acetone or Nail polish remover - Q-tips
PROCEDURE:
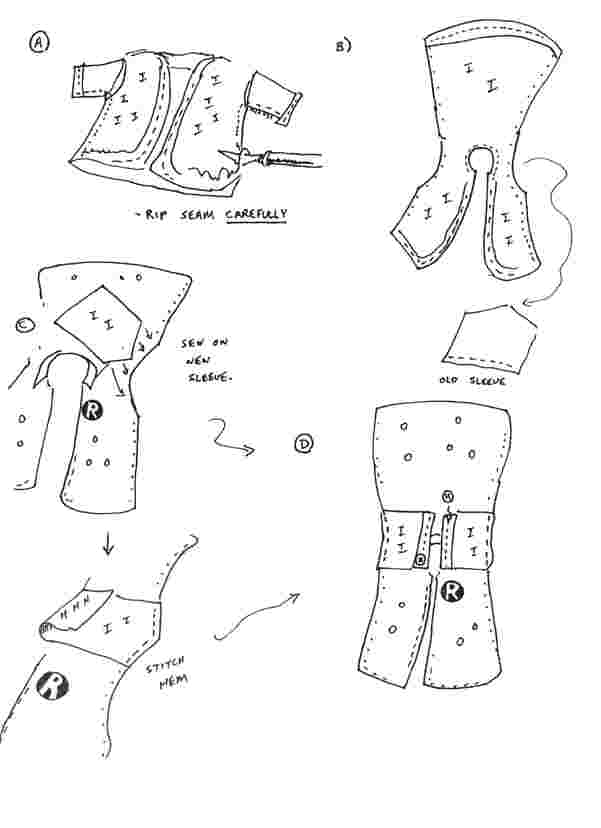
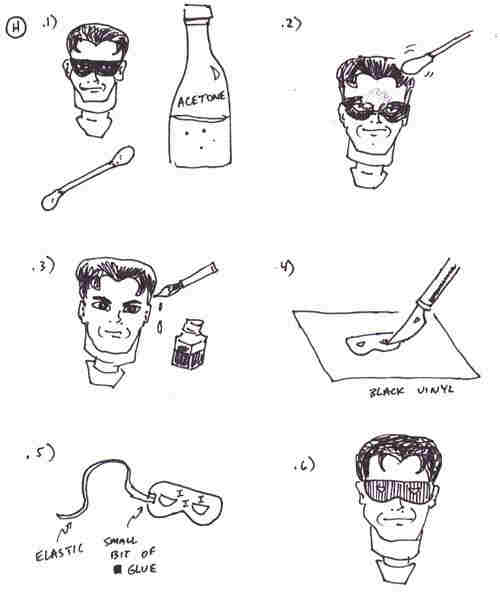
1) Disrobe your Robin and turn the costume inside out. Take your very sharp X-Acto knife and CAREFULLY work the tip under one of the stitches along the ribs close to the hip, and slit it. We are using an x-acto blade here instead of a seam ripper b/c a seam ripper isn't sharp enough and might destroy the 25 yr old nylon. Once you have slit one stitch, slit another and the seam should begin to open up. Work VERY SLOWLY in order to make sure you are not slicing the red nylon with the blade. [If your nylon is fraying pretty badly, you may want to use a little bit of "No Fray" (available at fabric stores) on the seams.] Work from the hip out to the edge of the sleeve. Repeat for the other seam. (fig A). Your tunic should now open up like a book. Working as before, carefully slit the seam that holds the sleeve to the shoulder, then set sleeve aside (fig B). 2) Lay your old sleeve down on the yellow fabric and trace around it with a fabric pencil or piece of chalk. (Note: my yellow fabric looks very green in my scan. This is a problem of my scanner. The fabric in actuality is the same shade as the cape, only slightly more florescent. Try to find a shade as close to what is pictured at the megomuseum as possible). Add approx 1/4 inch on all borders for the hem line and seam. Repeat for a second sleeve. Cut out along the lines you have drawn. On the illustrations, in any given illustration, I have used a coding system to let you know if you are looking at the inside of a garment, the outside of a garment, or the hem. If you are looking at what will eventually be the outside (the part that faces outward when done), little "O's " will be written on the surface of the fabric. If it is the inside, little "I's". If the hemline? Little "H's" Turn your opened-up tunic over so that that the Outside is facing out (fig C). Lay your sleeve down so that the "I" side is facing outward. Align the seams and stitch along the shoulder. Repeat for other sleeve. Fold the ends of the sleeve over and towards you by a 1/4 inch and stitch the hem (figs C+D). Turn your tunic inside out so that all of the I-sides of all fabric surfaces are facing you. Restitch the rib seam starting at the tip of the sleeve, stitching past the arm pit and down to the hip. Repeat for the other seam. Your tunic is now done (fig E)! 3) To make the trunks, cut a long strip of fabric (as shown in fig F) and wrap it around the waist to get the approximate waist size. Sew the hem of the waistline (fig G.1). Then stitch the two ends together to make a fabric tube (fig G.2). Position the vertical seam so it is in the center of one side (the seam that runs parallel up the middle of the butt of the figure). Take a scissors and cut two identical right triangles (one for each leg) out of the lower left and right corners of the tube (fig. G.3). Fold the fabric back over toward you and stitch the hem of the legs of the trunks (G.4). Finally, stitch the crotch. (G.5). If your shorts are too loose, take in the stitching in the back that runs parallel to the spine of the figure until you achieve the desired fit. 4) Take your PM Robin, a Q-tip , and some acetone (or nail polish remover), and start slowly removing the mask. Don't panic if you remove some of the eye paint, you can paint that back in later. If the paint is coming off difficultly, let the head soak face down in the nail polish remover for about 20 mins, then go back to it. You can also scrape it off with the X-acto blade when it has been sufficiently loosened with the acetone. (Fig H.1 and Fig H.2). Once you have complete removed the Painted mask, you must use some acrylic paint and fix any mistakes. Paint the whites of the eyes first, then the black dots of the eyes. Fix the hair if you scraped any of that off. Pain the eyelashes above each eye. Now paint in the eyebrows. Finally finish off the picture with a small white dot just off center of each eye for the pupil. Follow the pictures at the mego museum to get this just right.
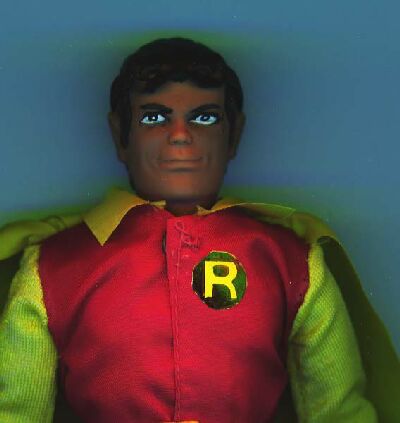
5) Using the pictures at the Mego Museum as a guide, cut a mask with eyeholes out of some flimsy black vinyl. (Note: my mask looks markedly different from the one pictured at the Mego Museum. This was a matter of personal preference in designing the mask. If you want yours to be truly authentic, follow the pix at the museum. I am just one of those heretics who believes he can improve upon the Mego design). Take a small length of some black elastic and affix and stitch it to the inside of the mask on both ends, or you can glue it like I did (I didn't want a stitch mark). If you don't trust your artistry skills here, repro masks (and belts) can be ordered from Paul "Dr. Mego" Clarke. He makes EXTREMELY good repro and custom parts for Megos. His website is located at: 6) My belt is courtesy Dr. Mego, but if you want to make your own, get some yellow elastic and an old margarine lid. Cut a box-shaped "8" out of the plastic and paint it gold. Work your length of elastic through your makeshift buckle and stitch the ends together. If you got the money, though, I'd recommend buying the repro from Doc Mego because his buckle is recast from RM ROBIN's so the authenticity factor is there. Finally, outfit your figure as shown, and voila!, you now have a RM Robin. - Price you paid (including raw materials) = $45-55 - Current market price for a loose RM Robin = $500-800
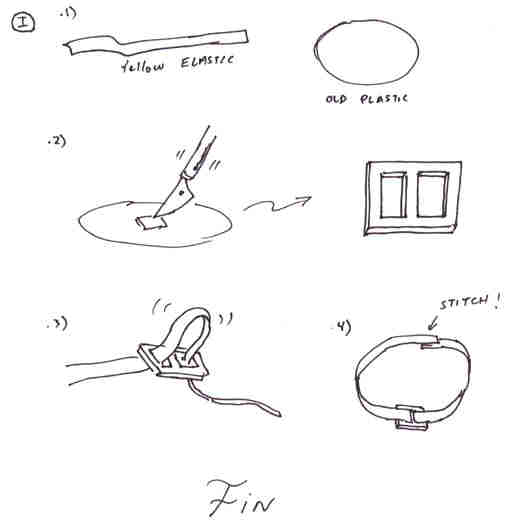
So, until next time, happy customizing! Matt (BTW, if any of you follow my tips, I would love to see your end results. Simply e-mail me at jaycoxma@pilot.msu.edu)
|


| CUSTOMEGO | GALLERIES | HOME | FAQ | FORUMS | SEARCH | CONTACT | LINKS |