
|
Hi everyone-- I know, I know. I said last time that we'd be learning how to sculpt heads from scratch at this update, but the photos didn't turn out. Basically, I need a better camera. But soon... I promise, soon. Instead, I've got something else for you today. Alot of people haven't customized, though they express a desire to do so, but don't know where to start, so I thought I'd present everyone with the easy, one day, anyone can do it, first time customizing job: Namor the Sub-Mariner. I know what you're saying, Namor is basically a naked man Action figure. But man, you wouldn't believe how a good-looking Sub-Mariner completes your line of Marvel megos in a way that you just don't realize until you see him on the shelf doing battle with your FF megos. So, here goes: Materials: - A "SWAT"
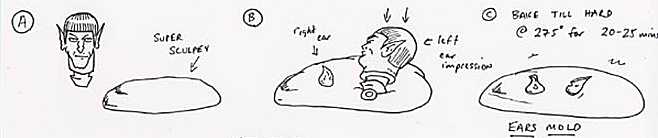
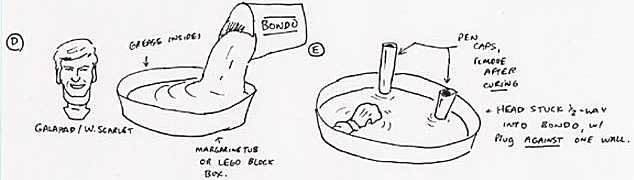
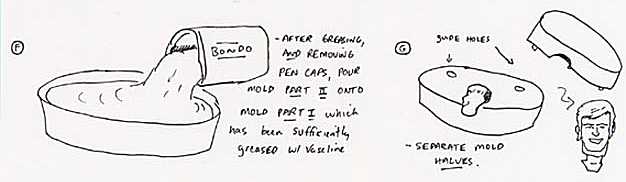
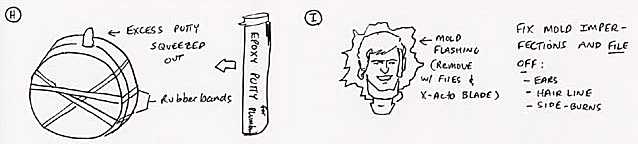
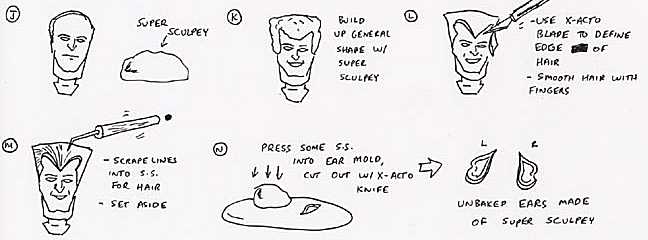
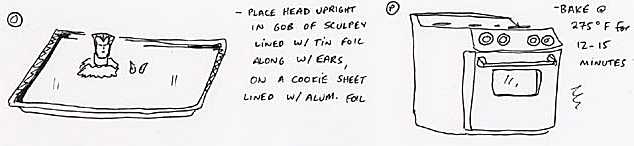
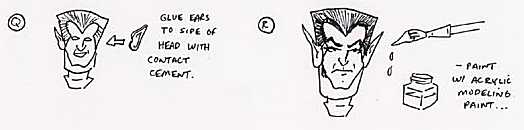
(or "Rookies") body naked from LJN. You can use a Mego type PROCEDURE: 1) Roll out some sculpey (when I say "Sculpey" I always mean "Super Sculpey") about 1/4 inch thick. Take Spock and press one ear into the clay firmly. Then, carefully remove his head and press his other into the clay, removing his head carefully (Fig. A+B+C). Bake this impression of Spock's ears @ 275 fpr 20-25 mins. (Note, if you don't have a Sir Galahad head, skip this step. I like to use Galahad's head b/c he has a great face, very pronounced features.) 2) Construct a mold box. I like to use Lego blocks for this or an old margarine tub.When using lego blocks, I make the box large enough to fit two heads in side to side, and 7 legos deep. The bottom of the box should be open. Coat the inside walls of the box (or margarine tub)with vaseline. Place the box on a piece of wax paper which has been smeared lightly with Vaseline. 3) Mix up enough Bondo to fill the box halfway. Mix in a disposable tub (old Margarine tubs are good.) If you coat the inside of the tub w/Vaseline, it can be used over and over. Pour the Bondo into the Mold box and allow it to settle a bit (fig D). Once it has start to set slightly, take Galahad (or Spock if you prefer) and press the front of his head into the Bondo until mid earline (fig. E). Make sure the flat of the neck plug touches one of the walls of the mold box. Then take a couple of pen caps coated in vaseline and press them into the Bondo at two separate places. (These will eventually make guide pegs for the mold so it will always line up.) 4) Once the mold has set, with your head still in there, coat all surfaces (excluding the head. The head won't stick to the bondo) with a thin coat of vaseline, This will keep the second part of the mold from sticking to the first. Mix up some more Bondo and pour it on top of the head slowly so no air bubbles form. Fill to the top of the mold box. Allow this to set as seen in (fig. F) 5) Remove the Legos and you now have a complete mold. Use a putty knife or screwdriver to separate the two halves (fig. G). Remove the original head and clean it off. You now have a mold of Sir Galahad (or spock). 6) Coat the insides of the mold with a little cooking spray (Pam, or use a thin smear of baby oil) and work it into all crevices. Knead up some A/B plumber's epoxy (enough for one head) and press it into the mold. I like to use Epoxy b/c it can withstand the heat of the oven in order to bake on extra clay. Note that Miliput is basically the same thing as plumber's putty, however it takes like 3 hours to set (as opposed to regular putty's 10 mins.) so you are able to sculpt it more. However, Miliput is expensive, which is why I use regular hardware brand epoxy putty. Fit the two halves together. Secure them with several rubber bands. Some of the excess should squeeze out the hole in the mold by the neck plug (see fig. H). You will know it is done curing when this is hard. When done, carefully remove your brand new cast of a head. The plastic that squeezed out to the side it called mold "Flashing." This can be removed with an X-acto blade and files and sandpaper (see fig. I). 7) Take out your files, sandpaper, and X-acto knife and start filing away. If using Spock or Galahad, file away the existing hairline until far back onto his head. If using Galahad, slice off his ears w/ X-acto knife (see fig. I+J). Smooth over any imperfections in the cast. 8) For either head, roll out some thin strips of Sculpey and lay them on the head to build up Namor's distinctive hairline. (Remember: he has that pronounced widow's peak and kind of flat top hairdo. At least the way Kirby drew 'em). Use your fingers and your sculpting tools (see fig. K). Remember, you're just interested at this point in building up the general shape of the head. Once you've got the general shape, take your smoother, or your finger, and run it very quickly, and very lightly in one direction across the surface of the clay. When this is done, if you still have fingerprints in the clay, using a clean paintbrush, apply a thin smear of Isopropyl rubbing alcohol on the clay. Isopropanol is a solvent of polymer clays and will dissolve any fingerprints, provided you don't use too much. Don't worry about the hairline until last. Once you have got the general shape of the hair, and no fingerprints, take your X-acto knife and define the edge of the hair (fig. L). Finally, use a sewing needle or a stylus and scrape some grooves into the hair (fig. M). Examine actual Mego heads to see how hair looks. Lines are long and flowing, not short and all the same length. Make sure you have smoothed the seam where Galahad's actual hair meets your custom hair. Your finger should work fine for this. 9) Take some Sculpey and press it into your ear molds which you made in step 1. Remove them carefully and cut them out of the rest of the clay with your x-acto knife (fig. N). 10) Place the head w/custom hair, along with molded ears, in the oven for about 12-15 mins. @ 275 F (figs. O+P). If cracks developed in your sculpey during baking, cover them with modeling glue (The kind you're not supposed to sniff). Smooth this over with your finger. (If using Spock, skip to step 12). 11) Take your Spock ears and glue them to the side of Galahad's head using contact cement (fig. Q). Your head is now ready to be painted!
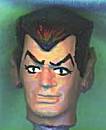
12) Your head is now ready to be painted! Mix up some flesh tone that is as close to the tone of the body you are using as possible. Since this figure is basically a naked man, the head and the body really have to match as closely as possible. Paint a primer coat of flesh tone on the head. Paint a second coat. Then paint in the whites of the eyes. Next paint the black of the hair. The eyebrows should be high, pointy and arched (getting this right will go a long way towards really making this look like Namor). Finally, Namor has very narrow eyes. Using a sable brush, place SMALL black dots in the center for his eyes. His eyelashes should be very pronounced and flair at the end. Forking them at the far corner of the eye helps as well. However, ONLY paint the top set. Finally, coat the head with a THIN coat of acrylic sealant. (Not too glossy). Your head is now done! How easy was that? (fig. R). 13) Underwear: If you have a spare pair of Robin's underwear, you're in luck. If not, you have to borrow them for a short while to make some patterns. Lay Robin's underwear down a sheet of paper and trace them in pencil. Now add 1/8-1/4 inch margin to this trace along every border. Pin this pattern to a piece of fabric that is two sheets of fabric thick (fold it over to do this ) (see figs. S+T). Cut out along the pattern lines. If you can't sew, get your significant other and/or Mom to help you. Separate the two halves of the trunks. (Robin can get dressed now). First stitch the hem of the waist. Then stitch the hems of the legs (fig. U). Don't worry if you stitch too much, Spandex stretches. If not, you can always rip the seam w/a seam ripper. Do the same for the other half of the trunks. Pin the two halves together so that the insides of the trunks are facing outward. Stitch the hips and the crotch ( Fig. V). Your trunks are now complete! 14) Bracelets and Belt. Nearing the home stretch here. Take a strip of flimsy yellow vinyl (like they make raincoats with), OR, take a length of yellow Electrical (PVC) tape and lay it down sticky side up. Take another piece of equal length and lay it down on top of this so that the sticky sides meet and now only the non-sticky sides face outward. Cut this to the desired length and width and sew snaps on the ends so that it will stay around Namor's belly. Cut a shell or sun design out of the tape and affix it to the front of the belt for the buckle. Use the same procedure above to come up w/wristbands. They can be sealed into a ring w/either a small thin piece of the tape used to make them or a small amount of cyanoacrylate glue (see figs. W+X). OR, if you have the money, order some repro Conan bracelets and belt from Dr. Mego (Paul Clarke). They work quite nicely, I have heard. Dr. Mego can be reached at: http://www.drmego.com 15) Wings on feet. Some of you may have better ideas for this. This is what I did however. Take a sharp heavy duty needle (large!) and pierce it all the way through the body's ankles just above where the pin is (or use a drill w/small bit). Repeat for the other ankle. Take 1.25 inch length of wire and press it through the hole so an equal amount of wire sticks out on either side. Repeat for other ankle (see fig. Y). Bend the ends of the wire up. Take your white PVC tape and wrap a small amount of it around the wire so it looks like Namor has a little white flag sticking out of his ankle (This is done by folding the tape back upon itself and sticking it together.) (see fig. Z.1). Repeat for the other three wings. Now take your scissors and cut veins and feathers into your wings (see fig. Z.2). Once this done, you now have posable wings where they belong! And there you go. Your Namor is ready for display! Hope you liked this and it got you enthusiastic about my favorite hobby. Please respond w/questions if you have any. Please share any customizing tips you have with me. Oh, what about the triton he carries? I'll let you figure that out. Besides, Mego probably would've cheaped out and not given him one anyway. They didn't give one to Aquaman. Matt |


| CUSTOMEGO | GALLERIES | HOME | FAQ | FORUMS | SEARCH | CONTACT | LINKS |