|
Customizing -- Green Lantern by Matthew Jaycox Here he is. The Granddaddy of them all. The figure that, if you want no other customs, you want this one! I of course speak of none other than the Emerald Avenger, Hal Jordan, the second, and still the coolest, Green Lantern (save your letters, Alan Scott and Guy Gardner fans!). I've gotten alot of requests for a How-To on this figure, but I've put it off b/c it requires some tricky sewing that beginner readers of mine probably weren't ready for. Now is the time though. This will be my last Figure customizing article for a little while. Instead, future articles will focus on such things as making accessories, specialty clothing items, making your own packaging etc... Future figures from here on out in articles may be chosen on the basis of how many requests I get for How-To on them. E-mail me with your preferences. My complete list of all the customs I have made will appear at the end of this article for you to refer to. Back to G.L. This figure will dress up your collection in a way you just don't realize until you see him standing with his other JLA counterparts. Get him right, and Mego fans everywhere will think you are a genius. Plus, on another level, we owe it to the guy to immortalize him since he appears on the Hall of Justice playset decals.... especially since D.C. in their all-seeing wisdom decided to have him leave D.C. universe continuity not by retiring or dying gracefully in battle-- NO that would show too much respect. They make him go crazy in a gender-bending rip-off of Marvels' Dark Phoenix saga and then have him kill himself! What the hell is wrong with D.C.?!? Every time they want to boost sales they kill or paralyze someone (Robin II, Batgirl, Batman, Superman, Flash, Green Arrow, Green Lantern), and usually someone whom I think is cool. Now c'mon, let's give him the respect he deserves. That said, let's get started! Materials [HEAD]:
- A Sir Galahad/ Will Scarlet head
Materials [costume]:
- Emerald green poly-interlock (spandex) fabric (flat green preferably)
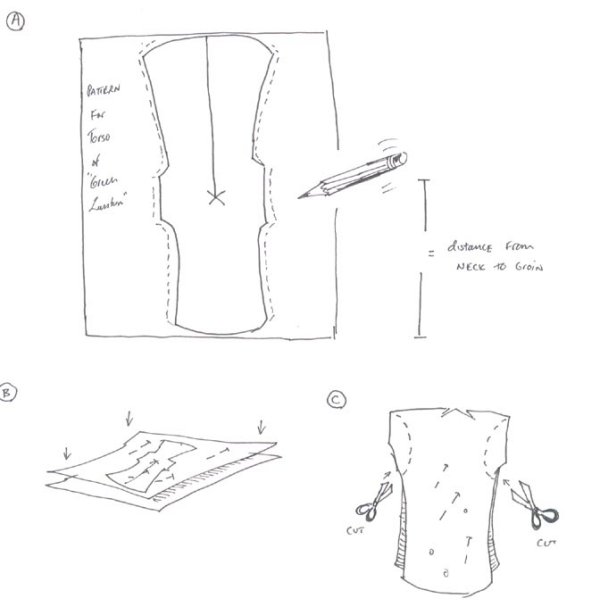
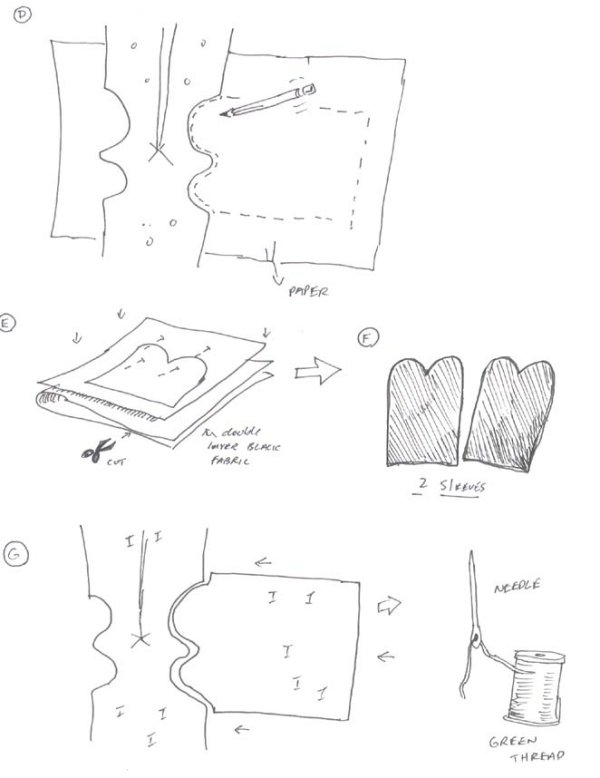
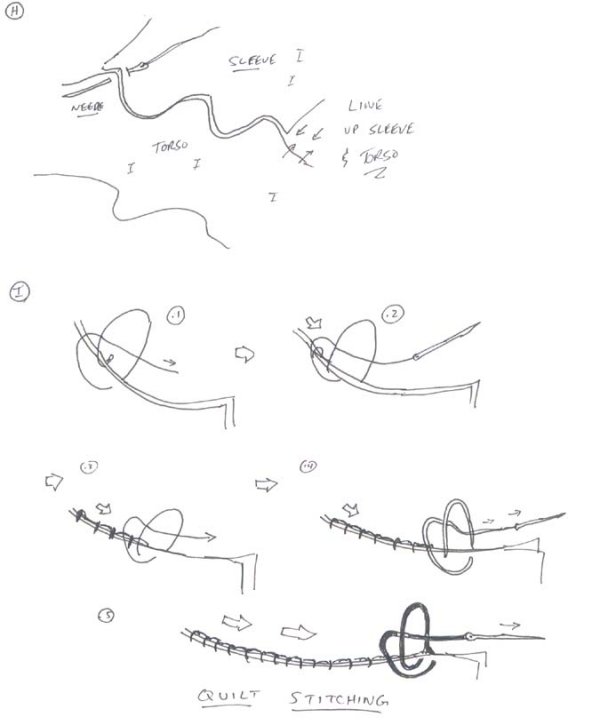
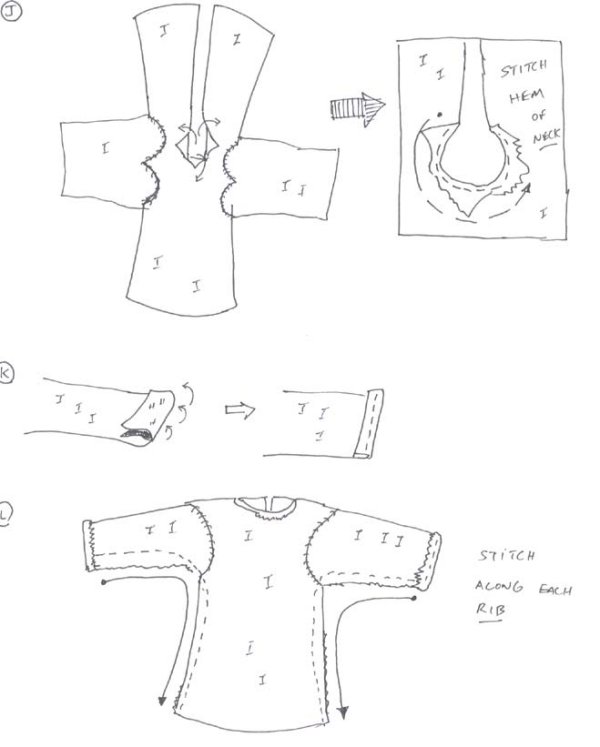
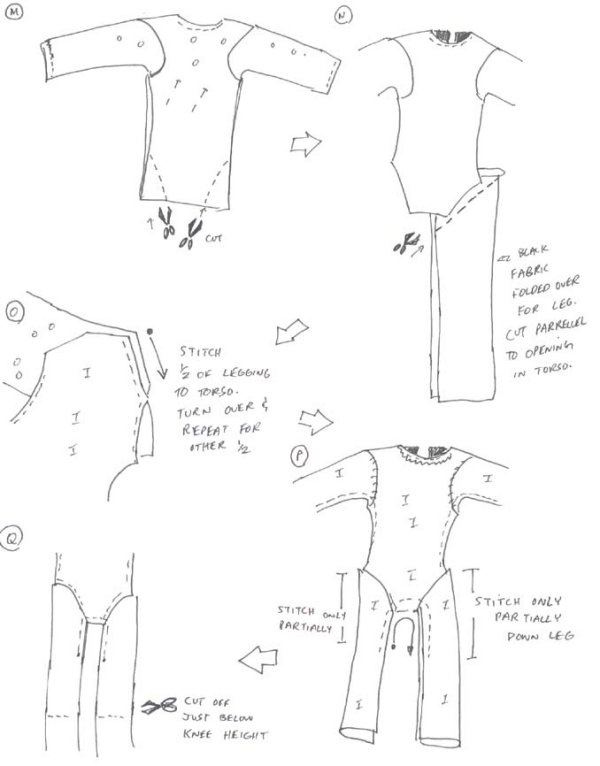
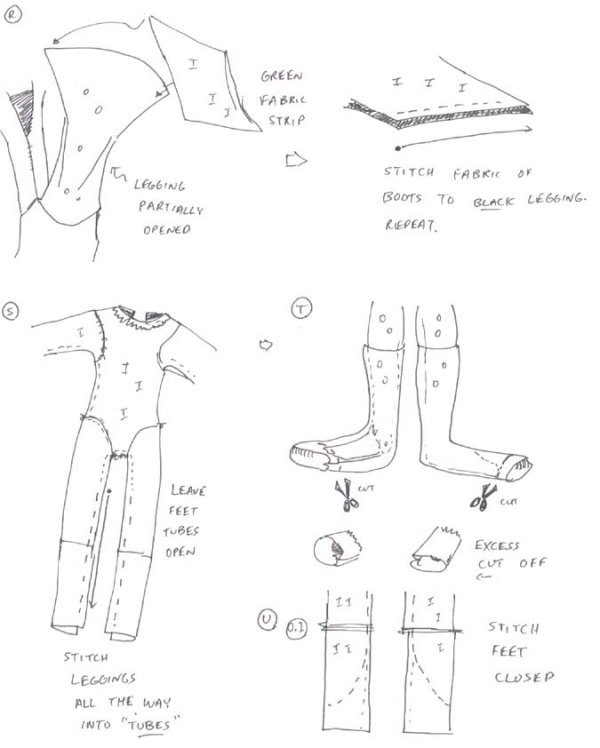
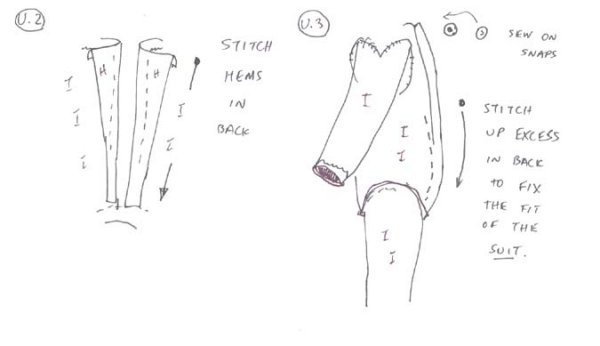
PROCEDURE:[Costume] 1) Take out the type II body you will use. Take your tape measure and start making measurements, such as the arm length, inseam, length from neck to crotch, length from neck to waste. Write these down and draw a pattern as shown in (figure A). Add 1/8" seam allowance to all seams. I have not given you the measurements, but that is how your pattern for the torso should generally look (figs A+B). Most people can make the patterns, they just don't know the order of the sewing, which is where I can help! 2) Lay your shirt pattern down on a single layer of Green fabric and pin the pattern to the fabric. Cut out along the lines. Remove the pattern and pins (fig. B). Fold the torso along a crease at where the shoulders will be (fig. C). Cut out the 2 semi-circles as shown. Lay your green torso down on a sheet of white paper, opening up the crease, and trace along the cut line. Draw this out an appropriate length for the arm pattern. Add 1/8" seam allowance (fig. D). Pin your pattern to a double-fold layer of black fabric and cut along the pattern lines. You now have two matching sleeves (figs. E+F). 3) Align the edge of your sleeve with the edge of the torso as shown in (fig. G). Make sure both of the I-sides are facing you. Get ready, it's time for some hand-stitching. Instead of screen printing on the black of this costume (which is what I'm sure Mego would have done), we are actually going to sew it on. But it is a tricky stitch, and a little complicated for a sewing machine, so I'm going to save you all a headache and show you how to do it by hand. It's very important to work very slowly when handstitching and to be patient so as not to make mistakes. 4) The type of stitch we are going to use is called a "quilt stitch." This is very similar to a normal "loop-running stitch" which many of you may know without actually knowing the name of it, however, with one slight modification. With a quilt stitch, you stitch a loop, but before pulling it closed, you begin another one and feed the end of the thread through the previous loop, and then pull the loop closed. This ties off each individual stitch and makes for a stitch that won't unravel on you and is very strong. It also makes for a straight line across the top of the stitch. Refer to (figs. H+I). So your two pieces of fabric are aligned as seen. I stick the needle through the black first, then through the green (fig. H). My thread has a knot in the end so it won't pull through. I make a loop away from myself (fig. I.1), go back through the green, then the black, but before pulling loop 1 closed, I feed the end of the thread through loop 1 (fig. I.1), and then pull it closed over the thread. (Figs. I.2-I.5) details a series of quilt stitches. Again, the order of the stitch is: Over, Back, Around, Through the loop, Pull closed. This is easily remembered with the mnemonic; "Our Baby Always Talks Preciously..." Stitches should be spaced about 1/16" a part and should begin about 1/8" below the edge of the fabric. Keep your stitches small and tight or they will show dramatically on the other side when the garment is turned right side out. 5) Okay, now you've stitched on both black sleeves. Now fold down the hem of the neck and stitch it as shown in (fig. J) Fold back the hems of the sleeves toward you and stitch them as well (fig. K). Repeat for other sleeve. 6) Turn your torso inside out so all of the I-sides are facing you and align the seams of the ribs and arms. Use pins to keep in place while stitching from the wrists towards the hips (fig. L). Keep in mind that Spandex STRETCHES, so it is okay to sew the arms narrower than the actual size of the Megos arms. It will stretch and show off the musculature quite nicely. Turn your garment right side out again and cut two right triangles out of the lower corners on each side of the torso while it is pinned in place (fig. M). Take along strip of black fabric that, when when folded over, is enough to fit one leg inside. Lay your torso over the fabric fold as shown in (fig. N) and cut the black fabric parallel to the leg openings in the torso (fig. N). Repeat for the other leg. 7) Turn your torso inside out again and with the I-side facing you, lay it down on the opened up legging whose O-side was facing you. The legging now resembles a long tower with a "roof." align the edge of the roof with the appropriate edge on the trunk of the torso. Stitch one half, or one "roof edge." Stitch the other "roof edge." Repeat fort he other leg (fig O). 8) Stitch the crotch and legs partially closed. Only stitch each leg as far down as mid thigh. See (fig. P). Cut off the excess black spandex just below where the knee would be (fig Q). Cut a short strip of green spandex the same width as the black. Turn the legs right side out so that the O-sides of the legs are facing you. Align the edge of the green fabric whose I-side is facing you with the edge of the black fabric leg (fig R.). Stitch the green to the black (fig. R). Repeat for the other leg. 9). Turn your garment inside out again so that all of the I-sides are facing you (fig. S). Stitch the legs closed but leave them open at the end so that the leggings are like fabric "tubes" (fig. S). Turn the garment right side out again and clothe your figure in it. Cut off the excess amount of fabric in the feet/boots, but leave at least 1/8" for seam allowance (fig. T). 10) Turn the garment inside out again so that the I-sides are facing you and stitch the feet closed as shown in (fig. U.1). Cut away the excess. With your garment still I-side out, fold the hems of the back toward you and stitch them as shown in (fig. U.2). (I wonder if Bono would play with a Mego of himself...). Now stitch the back halfway closed, from the butt to the middle of the back, taking up any excess give in the fabric along the way so that it fits snugly. Sew snaps on to the back near the top (fig. U.3). 11) I make gloves as arm bands and then paint the hands, much in the same way Mego did with Green Goblin. The gloves I made are from flimsy white vinyl folded over and cut with a flair (fig. V.1). I then glue the seam and presto, a nice vinyl glove! (fig. V.2). I use contact cement to glue the gloves shut. Some people I know use a thin piece of PVC tape of the same color as the vinyl and tape it along the seams. Either way, it looks pretty good. 12) Making the insignia. You can do this a number of ways. You can draw the insignia yourself on round stickers (fig. W), you can color copy one out of a Green Lantern comic and glue it to his chest. For those of you looking for the easy way, I have drawn you a pretty good insignia right here (fig. W). Simply print this page. Now either Xerox reduce or enlarge it until you've got your insignia to the desired size. Now color it in with a green marker. Now take it to your local Kinkos, or scan on your scanner and color print the sucker out. Color copy paper is usually of sufficiently high enough quality for my tastes to use as a sticker, however, if you want something a little more sturdy, place your paper insignia between two layers of clear packaging tape. Then cut out along the circle and you have a nice flexible laminated decal. Affix this to the front of your costume using Elmers glue, a thin smear on both the decal and the fabric itself. Press in place.I tend to place decals on when the figure is actually wearing the costume, but place a bit of masking tape over his chest under the garment so the glue doesn't bleed through and glue to the garment to the figure. 13) The easiest way to make a ring if you don't want to sculpt one out of Sculpt is to cut one using manicure scissors out of an only margarine tub lid. You can get the hole in the center of the lantern ring by pressing a needle through he plastic. (Fig. X). Now glue this to the hand using cyanoacrylate glue. Allow to dry and then paint your hands and ring. Note: You should paint the hand while the figure is dressed in the costume but with the sleeves pushed up. This will keep you from scratching off the paint when pull the costume on the figure. When dry, place the gloves back on carefully. Your costume is now done! Onto the head!
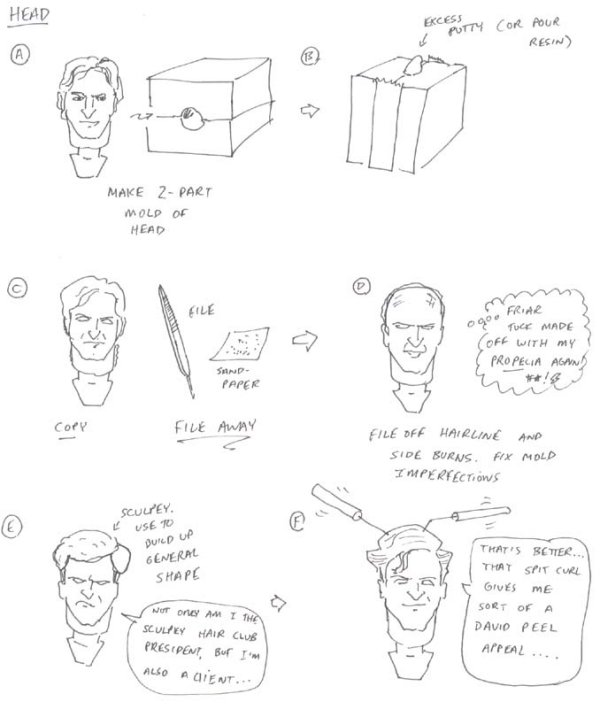
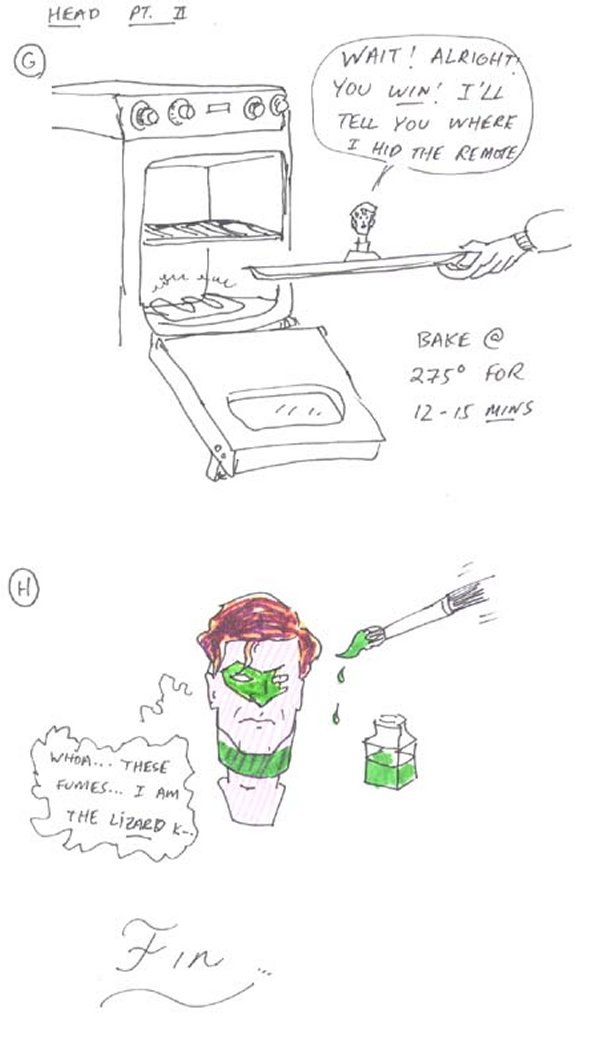
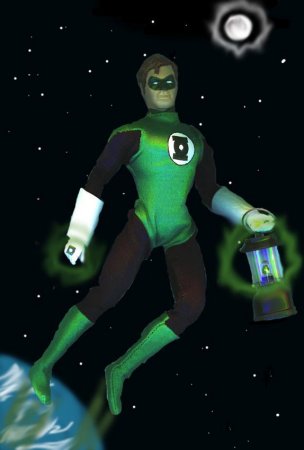
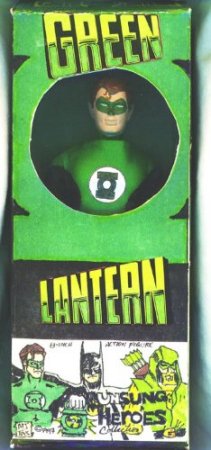
PROCEDURE: [Head] 1) Get your hands on a Sir Galahad/Will Scarlet head. As is often the case, this is the perfect base head for this figure. Some people will swear by Superman, but I don't like him for this. As someone pointed out, he looks like a young Hugh Hefner. Some people think Shazam works (which I used as the mock-up model when posing this figure inside his box. See photo), but I think his nose is too small and not enough chin. Some have used Mr. Fantastic, but I don't like his sunken in cheeks. Here are the reasons I used Will Scarlet as the base head. You are, of course, free to use whatever base head you prefer. - Has a great nose, eyebrows, eyes, and cheekbones Okay, so that's settled. Let's get on with it now shall we? 2) Make a 2-part mold of the head (fig Head A+B). Refer to my previous articles on Dr. Doom or ,The Greatest American Hero for procedure. Produce a copy. 3) Take out your files and X-acto knife and sand paper and start filing away (Fig. Head C+D). You want to file down his hairline and sideburns until he vaguely resembles Michael Milken sans hairpiece. 4) Roll out some small gobs of sculpey and lay them in thin sheets onto his head. Using your finger to smooth over any imperfections. At first, all you are trying to do is build up the general shape of the hair (fig E). Use your fingernails, fingers, smoother or anything that helps with this. Make sure you wiped all the dust off the head prior to the application of sculpey, or it won't adhere. Smooth over the seams where the Sculpey hair meets the actual hair of Will Scarlet. Now define the edge of the hair with your X-acto blade. Add a small rope of Sculpey for the spit curl (fig. F). Take your finger and with a quick, light wiping motion, rub out any marks or fingerprints. Now take your sculpting prods (or needles if you have none) and scrape some grooves into the hair. Imagine the way actual combed hair looks. Mak the lines long and curvy and flowing (Fig. F). To remove any final imperfections in the clay prior to baking, paint a THIN smear of isopropyl alcohol over the clay with a SOFT paintbrush. Alcohol is a polymer clay solvent and will remove things like fingerprints. It may also, however, dissolve some of your hair grooves which you will need to redefine. Blow on it gently to get the alcohol to evaporate more quickly. Now place the whole kit'n'kaboodle in the over at 275 F for 12-15 mins. (fig. G). Allow to cool. 5) Now paint your head. I like to mount the head on the body first before painting it (note, some filing down of the neck plug may be necessary as it is now made of hard plastic as opposed to PVC). That way, I don't ruin the paint job trying to force the head onto the body. This should be done prior to the final clothing of the figure, and hence painting of the hands and ring. I painted the head a base coat of flesh. Then I painted the hair a base coat of light brown so that the grooves on the hair would be lighter. I then painted the darker brown of the hair, going at right angles to the direction of the grain of the hair, so that the new paint wouldn't get in the lighter grooves, and now the grooves would stand out. I painted a final coat of flesh, then the whites of the eyes. Finally I painted in the green of the mask and the neck. (Fig. H). I painted a clear coat of falt acrylic sealant on at the and to protect the paint job as well as on the hands. And voila, here is the final product. Incidentally, I gave him more muscular arms from a LJN type body. Since the ball of the shoulder is larger than the Mego type II body shoulder socket, he really looks like he's got broad shoulders. Very heroic, don't you think? The lantern is just a mini-Coleman key-chain lantern available in the camping departments of most Wal-Marts and Meijers. I haven't gotten around to customizing it yet to look Like Hal Jordan's Lantern. Someday soon though, with an addendum to follow.
|


| CUSTOMEGO | GALLERIES | HOME | FAQ | FORUMS | SEARCH | CONTACT | LINKS |